
How to Fix a Pinhole in an Air Mattress: Step-by-Step Guide for 2026
Restore spinal support and learn how to fix a pinhole in an air mattress with practical sealant techniques for airtight comfort in October 2026.
 By Brad Nehring
Updated October 5, 2026
By Brad Nehring
Updated October 5, 2026
Waking up flat on the floor in the middle of the night is one of the most frustrating experiences with inflatable guest or camping beds. A microscopic puncture can slowly drain internal pressure over several hours, leaving your back sagging and your spine out of alignment. Learning how to fix a pinhole in an air mattress allows you to restore airtight support without discarding an otherwise functional bed. While some temporary fixes use a dedicated tape for air mattress punctures, a chemical liquid weld offers a far more resilient seal against body weight and air pressure.
Inflatable beds rely on continuous internal pressure to support natural spinal alignment and distribute body mass evenly across the mattress. When even a pinhole leak forms along a seam, flocking, or smooth vinyl surface, the bed loses firmness, forcing your hips to sink and stressing the lumbar region. Preparing the surface properly and using the correct liquid vinyl sealant creates a permanent bond that withstands repeated inflation and deflation cycles. Taking the time to patch the puncture correctly protects your investment and ensures your guests or camping companions enjoy reliable ergonomic support throughout the night.
| Award | Product | AMG Score About AMG ScoreThe AMG Score is our own rating from 0 to 10, based on performance, design and build, ease of use, and value. It reflects independent research and is never influenced by manufacturers, retailers, or affiliate commissions. Learn more › | |
|---|---|---|---|
| Best Overall |
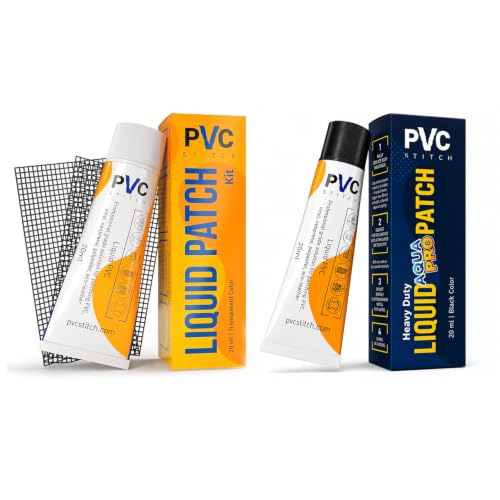
PVC Stitch Inflatable Air Mattress Repair Kit
|
9.1/10 | Buy |
PVC Stitch Inflatable Air Mattress Repair Kit
The PVC Stitch Liquid Sealant Bundle Kit is a specialized vinyl repair solution designed to permanently fix leaks, punctures, and tears on inflatable air mattresses and PVC sleep surfaces. Formulated to cure rapidly with included reinforcement cords, it offers guest room hosts and budget-conscious campers a dependable way to restore overnight air retention and prevent mattress sagging.
Pros
- Quick initial cure time allows repaired air beds to be inflated and used in as little as 2 hours
- Includes reinforcement cords to successfully bridge larger structural tears and cuts exceeding 30 mm
- Creates a flexible, pressure-resistant seal that holds up under adult sleeper body weight without peeling like adhesive tape
- Provides both clear and black sealant tubes to match different air mattress colors and outdoor sleep gear
Cons
- Emits a strong chemical odor during application that requires working in a well-ventilated room
- Incompatible with nylon-based fabrics and TPU coated sleeping pads, limiting use strictly to vinyl and PVC
- Requires a full 24-hour curing window to reach maximum tensile strength before supporting heavy sleep loads
Practical Repair Process: How To Fix A Pinhole In An Air Mattress and Restoring Airtight Support
Finding a pinhole in an inflatable mattress requires patience, but repairing it properly restores full comfort and extends the useful lifespan of your bed. Microscopic punctures often develop quietly from sharp ground debris, pet claws, or prolonged friction along folded seams. When an internal air chamber loses even a modest volume of air, the sleeping surface becomes slack, compromising lumbar support and causing noticeable morning back stiffness. Addressing the problem with a reliable liquid sealant rather than an unverified temporary cover ensures the mattress can withstand structural air pressure across an entire night.
Locating Microscopic Punctures on Vinyl Surfaces
Tracking down a pinhole leak begins with a methodical inspection before introducing any liquids to the mattress surface. Inflate the mattress to full capacity so the internal pressure pushes air firmly through any tiny structural breaches. Walk around the perimeter in a quiet room, pressing down gently on individual chambers while listening closely for a soft hissing sound. You can also run the sensitive skin on the back of your hand an inch above the material to detect faint air drafts escaping from the vinyl.
If listening alone fails to uncover the leak, a soapy water mixture provides a reliable diagnostic solution. Mix a small amount of mild liquid dish soap with warm water in a spray bottle or bowl until you produce a sudsy solution. Lightly wipe or spray the soapy mixture across suspect sections, paying close attention to welded seams, valves, and flocked surfaces. Escaping air will quickly generate expanding soap bubbles over the exact site of the pinhole, marking the precise spot for repair.
Liquid Sealants Versus Temporary Repair Tapes
Standard household glues or office tapes rarely provide a lasting fix for flexible PVC surfaces subjected to body weight. Traditional adhesives tend to dry stiff and brittle, cracking quickly as the synthetic material stretches under nocturnal movements. While travelers occasionally turn to adhesive tape for vinyl air beds in urgent situations, true structural restoration demands a flexible chemical bond. Specialized liquid sealants work by chemically fusing with the polyvinyl chloride rather than merely sticking to the outer surface.
The PVC Stitch Waterproof Liquid Sealant Bundle Kit is formulated specifically for flexible vinyl and PVC gear that endures high pressure. Unlike rigid superglues that snap when the bed flexes, this liquid patch material forms an elastic, pressure-resistant seal. Manufacturer specifications highlight that the cured bond resists ultraviolet exposure, water penetration, and substantial temperature swings. This durability makes it suitable for both indoor guest room mattresses and rugged outdoor camping air beds.
Surface Preparation and Flocking Removal Protocols
Proper surface preparation dictates whether a patch holds air permanently or separates under sleeping weight. Before applying any adhesive, you must completely deflate the air mattress and lay the damaged section over a flat, firm surface. Releasing internal pressure prevents air from bubbling outward through the wet sealant, which would create microscopic tunnels in the patch. Clean the perimeter around the pinhole thoroughly using isopropyl alcohol on a lint-free cloth, allowing it to dry completely.
If the pinhole is situated on the soft, velvety flocked top of the bed, you must remove the flocking before sealing. Liquid sealant cannot create an airtight seal over loose textile fibers because air will continue to track beneath them. Gently buff away the fuzzy fibers around the pinhole using fine-grit sandpaper until you expose the smooth vinyl base. Wipe away all sanded dust with an alcohol swab and verify that the exposed vinyl is completely clean and dry before patching.
Step-by-Step Liquid Patch Application Process
Applying a liquid vinyl patch requires a deliberate hand and careful attention to manufacturer guidelines. Uncap the sealant tube and position the nozzle directly over the pinpoint puncture on the deflated mattress. Squeeze the tube gently to deposit a generous droplet of liquid patch over the hole, extending roughly a half-inch beyond the puncture in all directions. Ensure the bead is thick enough to form a self-leveling membrane over the puncture site without brushing the liquid thin.
Brushing the adhesive is discouraged because it introduces air bubbles, breaks surface tension, and weakens the protective barrier. Let the liquid settle and self-level naturally across the smooth vinyl surface in a well-ventilated space. If your mattress suffers from an elongated tear longer than thirty millimeters, place the kit reinforcement cord into the cut and cover it thoroughly with sealant. For standard pinholes, the liquid sealant alone provides ample tensile resilience without needing additional cord reinforcement.
Curing Timelines and Environmental Conditions
Rushing the drying process is the most frequent reason inflatable mattress patches fail prematurely. According to the manufacturer instructions, the liquid patch reaches an initial set state and becomes ready to use after approximately two hours. While a two-hour window offers quick utility for emergency situations, optimal longevity requires patience. The sealant achieves its maximum chemical bond strength and pressure resistance after a full twenty-four hours of undisturbed curing.
Ambient temperature and humidity significantly influence how quickly the solvent evaporates and cross-links with the vinyl. For best results, allow the patch to cure in a dry room maintained between sixty-five and seventy-five degrees Fahrenheit. Curing in excessively cold or damp spaces can retard the chemical reaction, resulting in a cloudy or weaker elastomer layer. Keep the deflated mattress completely undisturbed on a flat surface away from direct heat sources and foot traffic throughout the curing period.
Checking the physical state of the patch before reinflation helps confirm that the chemical bond has set completely. Lightly tap the edge of the cured seal with a clean fingertip to ensure it feels tack-free and rubbery. The finished seal should feel flexible yet firm, firmly anchored to the underlying mattress surface. If the sealant feels gooey or soft, allow it several additional hours of drying time before introducing air pressure.
Post-Repair Testing and Airtight Verification
Testing your repair properly ensures your sleep setup will remain fully supportive throughout the entire night. Once the recommended twenty-four-hour curing window has elapsed, attach your pump and inflate the air mattress to standard firmness. Do not overinflate the chamber beyond its normal profile, as excessive tension strains newly formed adhesive margins. Listen closely around the patch area for any hissing sounds that might indicate persistent micro-fissures.
Apply a small dab of soapy water over the newly cured patch to confirm that zero air bubbles emerge under internal pressure. If the surface remains calm without bubbling, wipe away the moisture with a dry cloth and prepare for a static load check. Place a moderate weight, such as a stack of heavy books, directly over the sleeping area for several hours. This simulated body pressure verifies that the patch maintains its airtight seal under realistic dynamic load conditions.
Material Limitations and Synthetic Fabric Compatibility
Understanding the specific synthetic composition of your air bed prevents wasted effort and failed repairs. Most traditional residential air mattresses, inflatable guest beds, and recreation floats are manufactured from polyvinyl chloride. Liquid patch formulas fuse seamlessly with standard PVC and vinyl fabrics by dissolving and blending the adjacent polymer chains. When applied to compatible vinyl, the resulting patch behaves like a continuous piece of the original mattress wall.
Manufacturer documentation explicitly notes that this liquid sealant will not bond with nylon-based fabrics. Many ultra-lightweight backpacking sleeping pads and premium camping mats utilize thermoplastic polyurethane coated nylon rather than pure PVC. Attempting to use a vinyl-specific liquid patch on nylon weaves results in poor adhesion and inevitable delamination under pressure. Always inspect the manufacturer care tag on your mattress to verify its primary material before applying chemical adhesives.
Ergonomic Consequences of Deflation on Spinal Health
Maintaining consistent air volume inside an inflatable bed is critical for preserving healthy spinal alignment. When an air mattress slowly deflates during the night, the heaviest portion of the human body, the pelvis, sinks excessively into the core. This unnatural sagging forces the lumbar spine into excessive flexion, straining lower back muscles and ligaments. Waking up on a partially deflated mattress frequently causes acute back stiffness and joint discomfort that lingers throughout the morning.
Pressure loss also undermines the surface responsiveness needed for effortless repositioning during deep sleep cycles. In a properly pressurized air chamber, combination sleepers can turn smoothly without exerting extra muscle effort or waking their sleep partner. As pressure drops, the mattress creates a hammock effect that traps the sleeper in a hollow depression. Restoring a pinhole puncture eliminates this sagging, allowing the mattress to distribute body mass evenly across hips, shoulders, and legs.
Sleeper body weight amplifies the ergonomic penalty of an unpatched pinhole leak. Lightweight sleepers under one hundred thirty pounds might experience gradual softening, but individuals over two hundred thirty pounds sink rapidly through a leaking mattress. Heavier mass accelerates air loss through micro-punctures, quickly bottoming out the mattress against the hard floor. Maintaining an airtight chamber ensures that sleepers across all weight categories receive the consistent contouring support necessary for restful, restorative sleep.
Preventing Future Punctures and Long-Term Maintenance
Preventing pinholes before they occur protects your mattress and avoids disruptive middle-of-the-night deflation. Always inspect the floor or ground thoroughly before laying out your inflatable bed, sweeping away grit, staples, and small rocks. Using a protective underlayment, such as a thick moving blanket or durable groundsheet, provides a reliable puncture barrier beneath the smooth bottom vinyl. Keep household pets with sharp claws away from the bed, as their nails easily puncture vinyl during playtime.
Routine handling and folding habits also dictate the long-term durability of vinyl air chambers. Avoid repeatedly creasing the mattress along the exact same fold lines, which can fatigue the material and encourage seam fissures. Instead, roll the deflated mattress loosely and store it in a temperature-controlled closet inside a dedicated carry bag. Managing inflation pressure properly prevents seam separation, ensuring your repaired bed delivers reliable, pain-free sleep support for years to come.
Successfully sealing a pinhole leak with a flexible liquid patch restores the structural integrity and comfort of your air mattress without expensive replacements. By thoroughly cleaning the vinyl, removing flocking fibers, and allowing a full twenty-four-hour cure, you create a durable, airtight seal that withstands repeated inflation cycles. Regular surface inspections and cautious floor preparation ensure your repaired bed delivers reliable, pain-free sleep support for years to come.
About the author
Brad Nehring is an experienced sleep-product tester and writer who has spent nearly a decade evaluating mattresses and related sleep products. His expertise centers on product performance, comfort, construction and real-world usability, with an emphasis on helping shoppers understand meaningful differences before buying.